Spring Boot: Building a RESTful Web Application
Introduction:
REST stands for Representational State Transfer and is an architectural guideline for API design. We assume that you already have a background in building RESTful APIs.
In this tutorial, we’ll design a simple Spring Boot RESTful web application, exposing a few REST endpoints.
Project Setup:
Let’s start by downloading the project template via Spring Initializr: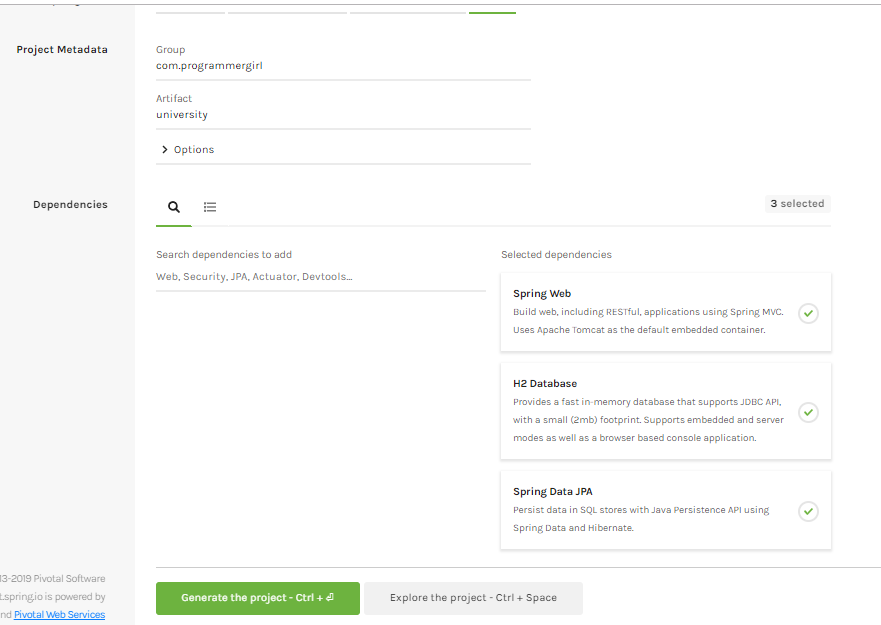
We only need to add ‘Spring Web’ as an extra starter dependency for RESTful web applications. We have added the other two assuming we’re interacting with the database as well.
POM file:
Our POM file will now have all the needed web application and database dependencies:
<dependency>
    <groupId>org.springframework.boot</groupId>
    <artifactId>spring-boot-starter</artifactId>
</dependency>
<dependency>
    <groupId>org.springframework.boot</groupId>
    <artifactId>spring-boot-starter-test</artifactId>
</dependency>
<dependency>
    <groupId>org.springframework.boot</groupId>
    <artifactId>spring-boot-starter-web</artifactId>
</dependency>
<dependency>
    <groupId>org.springframework.boot</groupId>
    <artifactId>spring-boot-starter-data-jpa</artifactId>
</dependency>
<dependency>
    <groupId>com.h2database</groupId>
    <artifactId>h2</artifactId>
    <scope>runtime</scope>
</dependency>
REST Controller:
Let’s now define our REST controller:
@RestController
@RequestMapping("/student")
public class StudentController {

    @Autowired
    private StudentService studentService;

    @GetMapping("/all")
    public ResponseEntity<List<Student>> getAllStudents() {
        return new ResponseEntity<List<Student>>(studentService.getAllStudents()
            , HttpStatus.OK);
    }

    @GetMapping("/{id}")
    public ResponseEntity<Student> getStudentById(@PathVariable("id") Integer id) {
        Optional<Student> student = studentService.getById(id);
        if(student.isPresent())
            return new ResponseEntity<Student>(student.get(), HttpStatus.OK);
        else
            throw new ResponseStatusException(HttpStatus.NOT_FOUND
              , "No student found!");
    }

    @PostMapping("/")
    public ResponseEntity<Student> createStudent(@RequestBody
     Student student) {
        Student newStudent = studentService.store(student);
        return new ResponseEntity<Student>(newStudent, HttpStatus.CREATED);
    }

    ...
}
We can define all our GET, POST, DELETE or PUT mappings in our controller.
Service:
Here, the StudentService is the class interacting with the database and doing all the operations for us:
@Service
public class StudentService {
    @Autowired
    private StudentRepository repo;

    public Student store(Student student) {
        return repo.save(student);
    }

    public List<Student> getAllStudents() {
        return repo.findAll();
    }

    ...

}
We have another tutorial explaining how to configure the H2 database with Spring Boot.
Running the Application:
Finally, we can run our UniversityApplication class:
@SpringBootApplication
public class UniversityApplication {

    public static void main(String[] args) {
        SpringApplication.run(UniversityApplication.class, args);
    }
}
With which our REST endpoints will be exposed on the embedded server.
Testing REST Endpoints:
Let’s use cURL to test out our REST endpoint:
$ curl http://localhost:8080/student/all
This will return all the student records present in our database:
[{1, "James"}, {2, "Selena"}, {3, "John"}]
Similarly, we have:
$ curl http://localhost:8080/student/1
{1, "James"}
We can also use POSTman tool to test our endpoints. It has a great user-interface.
Conclusion:
In this tutorial, we built a Spring Boot RESTful application from scratch. We exposed a few API and then tested them using cURL.
ProgrammerGirl you are too Good,, please add some real time concepts which will help in projects like spring with OAuth 2, jwt, Docker and K8s etc, if possible aws….
Albert Einstein said: if you can’t explain it in simple way then you didn’t understand it well.
ProgrammerGirl you explained in simple way effectively …
Glad it helped 🙂
Sure, will add these to my list.