Spring Boot with H2 Database
Introduction:
In this quick tutorial, we’ll bootstrap a simple Spring Boot application backed by an in-memory H2 database. We’ll use the Spring Data JPA to interact with our database.
Project Setup:
Firstly, let’s generate our project template using Spring Initializr:
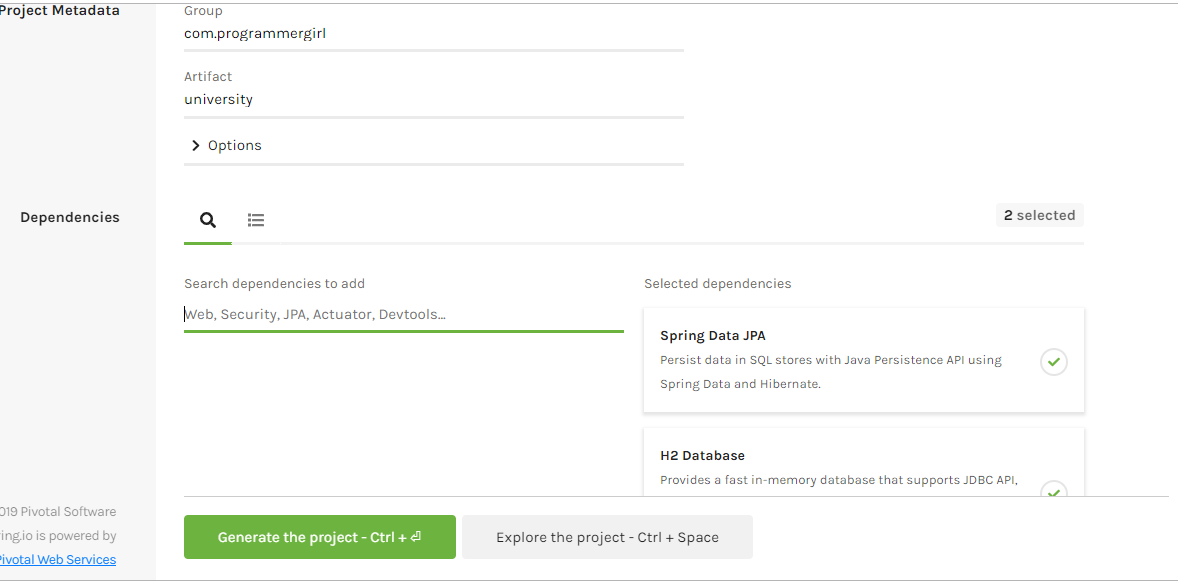
On clicking the ‘Generate the project’ link, our project files will get downloaded.
Now, if we look closely at the generated POM file, we’ll have below added dependencies:
<dependency>
    <groupId>org.springframework.boot</groupId>
    <artifactId>spring-boot-starter</artifactId>
</dependency>
<dependency>
    <groupId>org.springframework.boot</groupId>
    <artifactId>spring-boot-starter-test</artifactId>
</dependency>
<dependency>
    <groupId>org.springframework.boot</groupId>
    <artifactId>spring-boot-starter-data-jpa</artifactId>
</dependency>
<dependency>
    <groupId>com.h2database</groupId>
    <artifactId>h2</artifactId>
    <scope>runtime</scope>
</dependency>
H2 Default Properties:
Since we have added H2 database dependency, Spring Boot will auto-configure its related properties. The default configurations include:
spring.datasource.url=jdbc:h2:mem:testdb
spring.datasource.driverClassName=org.h2.Driver
spring.datasource.username=sa
spring.datasource.password=
spring.h2.console.enabled=false
Let’s override a few of these properties by defining those in our application.properties file:
spring.h2.console.enabled=true
spring.h2.console.path=/h2
spring.datasource.url=jdbc:h2:mem:university
Here, our database name will be a university. We have also enabled the H2 Console and have set its context path.
Defining Entities:
Now, we’ll define a Student entity:
@Entity
public class Student {
    @Id
    @GeneratedValue(strategy = GenerationType.AUTO)
    private Integer id;

    private String name;

    public Student(String name) {
        this.name = name;
    }

    //getters, setters

    public String toString() {
        return "{id=" + id + ", name=" + name + "}";
    }
}
And its corresponding Spring Data JPA repository:
@Repository
public interface StudentRepository
  extends CrudRepository<Student, Integer> {
}
The Student entity will get mapped to the database table with exactly the same name. If we want, we can specify a different table name with @Table annotation.
The Application Class:
Finally, let’s implement our UniversityApplication class:
@SpringBootApplication
public class UniversityApplication {

    public static void main(String[] args) {
        SpringApplication.run(UniversityApplication.class, args);
    }

    @Bean
    public CommandLineRunner testApp(StudentRepository repo) {
        return args -> {
            repo.save(new Student("James"));
            repo.save(new Student("Selena"));

            List<Student> allStudents = repo.findAll();
            System.out.println("All students in DB: " + allStudents);

            Student james = repo.findById(1);
            System.out.println("James: " + james);
        };
    }
}
This class is the starting point for our Spring Boot application. Here, the @SpringBootApplication annotation is equivalent to having @ComponentScan, @EnableAutoConfiguration, and @SpringConfiguration together.
We have also defined an instance of CommandLineRunner. And so, when we run our application, our console logs will have:
UniversityApplication:All students in DB: [{id=1, name=James}
 , {id=2, name=Selena}]
James: {id=1, name=James}
...
Please note that in Spring Boot, all entities should ideally be defined at either the same package level or at lower levels(in sub-packages) to that of the main application class. If so, Spring Boot will auto-scan all those entities.
Accessing the H2 Console:
We can also check the database entries on the H2 console.
To do that, we’ll open the URL: http://localhost:8080/h2 on any browser and use our database configurations to login. With it, we’ll be able to see all our created tables and entries easily on a UI Console dashboard.
Conclusion:
In this tutorial, we bootstrapped a very simple Spring Boot application with a single entity. This application is integrated with the H2 database and uses Spring Data JPA.
We can easily extend it to cater to a much wider application scope.