Spring Core Annotations
Introduction:
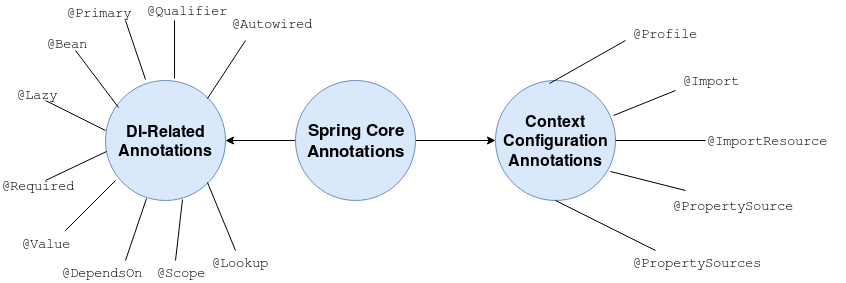
Spring annotations present in the org.springframework.beans.factory.annotation and org.springframework.context.annotation packages are commonly known as Spring Core annotations. We can divide them into two broad categories: DI-Related Annotations & Context Configuration Annotations:
In this tutorial, we’ll explore all of these Spring Core annotations.
DI-Related Annotations:
1. @Autowired:
We use @Autowired to mark the dependency which will be injected by the Spring container. It can be used with a constructor, setter or field-based injection.
Constructor Injection:
public class Employee {
    private Department dept;

    @Autowired
    public Employee(Department dept) {
        this.dept = dept;
    }
}
For a constructor-based injection, all the constructor arguments are mandatory. Also Spring version 4.3 onwards, we can skip explicitly annotating the constructor with @Autowired annotation unless we have two or more of them.
Field Injection:
public class Employee {
    @Autowired
    private Department dept;
}
Setter Injection:
public class Employee {
    private Department dept;

    @Autowired
    public void setDept(Department dept) {
        this.dept = dept;
    }
}
The @Autowired annotation also takes in an optional boolean argument named required. By default, its value is set to true. We can explicitly set it to false for which Spring won’t throw an exception when the auto-wiring fails.
2. @Qualifier:
We use @Qualifier along with the @Autowired annotation to avoid ambiguity when we have multiple beans of the same type.
Let’s say we have two classes:
@Component
public class Employee implements Person {}

@Component
public class Student implements Person {}
Since both of them implements Person interface, Spring has no means to know which Person bean to inject when using @Autowired. To resolve this issue, we can use @Qualifier annotation:
public class Main {

    @Autowired
    @Qualifier("employee")
    private Person person;
}
Just like @Autowired, we can use it with a setter, constructor or field-based injection.
3. @Primary:
We now know that we can use @Qualifier along with @Autowired when we have multiple beans of the same type. However, most of the time we’ll specifically need one of those bean’s instance and rarely the others. We can mark the most frequently used bean with @Primary annotation. With it, all unqualified injections will resolve to our primary bean.
@Primary
@Component
public class Employee implements Person {}

@Component
public class Student implements Person {}

@Component
public class EmployeeHandler {

    @Autowired
    private Person employee;
}

@Component
public class StudentHandler {

    @Autowired
    @Qualifier("student")
    private Person student;
}
Since we have given a qualifier in StudentHandler, the Student bean will be injected. For our EmployeeHandler, we have skipped the qualifier and so an Employee will be injected. This is so as Employee is our primary bean of type Person.
4. @Bean:
@Bean is a method-level annotation used in @Configuration class. It marks a factory method used to instantiate a Spring bean:
@Configuration
public class AppConfig {
    ...
    @Bean
    public Employee employee() {
        return new Employee();
    }
}
When a new instance of the return type is required, Spring will call these methods. The instantiated bean has the same name as that of the factory method. If we want to give it a different name, we can do so using the name argument of this annotation.
@Bean("myEmp")
public Employee employee() {
    return new Employee();
}
5. @Lazy:
Spring, by default, instantiates all singleton beans at the time of application startup. If we want to prevent this eager initialization, we can use @Lazy annotation. When we use @Lazy annotation, the bean will be first instantiated on a user request.
We can place this annotation on:
- @Bean annotated method to delay a specific bean instantiation
- a class annotated with @Configuration to delay creating all beans defined in this class
- a class marked as @Component, which will then lazy load
- along with @Autowired annotation over a constructor, field or a setter. Here as well, container will not load the injected dependency until we receive the first user request
@Configuration
public class AppConfig {

    @Bean
    @Lazy
    public Employee employee() {
        return new Employee();
    }

    @Bean
    public Student student() {
        return new Student();
    }
}
It also accepts an optional boolean argument value with a default set to true. If we set it to false, it will eagerly instantiate the bean. This can come handy when we have a Configuration to load all beans lazily except a few.
6. @Required:
@Required is a method-level annotation used on setter methods of a bean. It simply marks the dependencies we want to populate using an XML:
@Required
void setName(String name) {
    this.name = name;
}
<bean class="com.programmergirl.spring.Employee">
    <property name="name" value="Joey" />
</bean>
On failing to do so, it will throw a BeanInitializationException.
7. @Value:
We can use @Value to inject property values defined in external sources into our beans. For instance, we can define a few properties in our application.yaml or application.properties file:
james.employee.id = 2563
And then inject that value into our bean:
@Value("${james.employee.id}")
private String jamesEmpId;
We can also use @Value with SpEL.
8. @DependsOn:
The @DependsOn annotation can force the Spring container to initialize one or more beans before the bean annotated with @DependsOn annotation.
Usually, this behavior is automatic. We’ll only need it when we have implicit dependencies, for example, loading a JDBC driver.
We can use @DependsOn annotation on any class directly or indirectly annotated with @Component or on factory methods annotated with @Bean.
@Configuration
public class AppConfig {

    @Bean
    @DependsOn(value = {"employee"})
    public Dependent dependent() {
        return new Dependent();
    }

}
9. @Scope:
We use @Scope annotation to define the scope of a @Component class or a @Bean definition. It can be either singleton, prototype, request, session, globalSession or some custom scope.
@Component
@Scope("prototype")
public class Employee {}
10. @Lookup:
A method annotated with @Lookup tells Spring to return an instance of the method’s return type when we invoke it. It’s useful for:
- injecting a prototype bean into a singleton instance
- procedurally injecting dependencies
To learn how to inject a prototype bean into a singleton bean, please feel free to refer to this article.
Context Configuration Annotations:
We can configure our application context using the below annotations:
1. @Profile:
If we want Spring to use a @Component class or a @Bean method only when a specific profile is active, we can mark it with @Profile annotation. We can mention the name of the profile with the value argument of this annotation:
@Component
@Profile("dev")
public class Employee {}
2. @Import:
Using this annotation, we can specify one or more @Configuration classes to import.
@Configuration
public class EmployeeConfig {

    @Bean
    public Employee employee() {
        return new Employee();
    }
}

@Configuration
@Import(EmployeeConfig.class)
public class AppConfig {

    @Bean
    public Student student() {
        return new Student();
    }
}
With this, we can just specify the AppConfig class explicitly while initializing an application context. It will automatically import beans defined in our EmployeeConfig.
3. @ImportResource:
We can use this annotation to load beans into the ApplicationContext from the applicationContext.xml file:
@Configuration
@ImportResource({"classpath*:applicationContext.xml"})
public class AppConfig {
}
4. @PropertySource:
This annotation provides a convenient way to define a property file to use for application settings:
@Configuration
@PropertySource("classpath:appConfig.properties")
public class DatabaseConfig implements InitializingBean {

    @Autowired
    Environment env;

    ...

    void setDbConfig() {
        DataSourceConfig config = new DataSourceConfig();
        config.setDriver(env.getProperty("jdbc.driver"));
        config.setUrl(env.getProperty("jdbc.url"));
        config.setUsername(env.getProperty("jdbc.username"));
        config.setPassword(env.getProperty("jdbc.password"));
    }

}
5. @PropertySources:
We can use this annotation to specify multiple @PropertySource configurations:
@Configuration
@PropertySources({
    @PropertySource("classpath:/student.properties"),
    @PropertySource("classpath:/employee.properties"),
    @PropertySource("classpath:/database.properties")
})
class AppConfig {}
Java 8 onwards, we can achieve the same with just using repeated annotation feature i.e. directly specifying multiple @PropertySource annotations.
Conclusion:
In this article, we covered the most common Spring core annotations. We can use them either for bean wiring or configuring an application context.